Showing posts with label costume. Show all posts

Thursday, 25 January 2024

My favourite number is SIX

Hello Lovelies!

If you want to read all about my difficulties navigating and how I overcame them, you can read about it HERE but if you want to know what I did on the first part of my winter holiday then read on. 

 This holiday was split into two events--SIX on Sunday and the Wholiday on Tuesday to Thursday, so here is part one of the brilliant week I had. 

About four months ago, I saw an advert on Facebook that the musical SIX all about the wives of Henry VIII was coming to the Swansea Arena in January. I impulsively bought a ticket and decided that 2024 was the year that I would just figure out how get places.  I imagined that this would be my one brave act of the year because I really wanted to go see this musical as I have been hyper focused on the songs and obsessed (obsessed I tell you!) with the costume design. Then suddenly the Amazing Spiderman appeared to me in a dream and told me that I also needed to go to Weston-Super-Mare and the only time I could get time off work was the very same week as SIX. So, this was really happening.


If you are not familiar with SIX, then this is what you need to know. All six wives of Henry VIII are upset because all anyone ever knows about them are the words: DIVORCED, BEHEADED, DIED, DIVORCED, BEHEADED, SURVIVED.  At first, they are in competition with each other to try to be the one who had it the worst, but then they realise their lives were so much more than just their relationship to one terrible and powerful man. Themes relating to the idea of female beauty as well as the grooming of young girls and then slut shaming them make this a powerful feminist show.

 Each queen sings in the style of famous pop stars. Wikipedia says:

Catherine of Aragon: is modelled after a mixture of BeyoncéJennifer Lopez, and Jennifer Hudson

Anne Boleyn: includes elements of Miley CyrusAvril Lavigne, and Lily Allen

Jane Seymour: is reminiscent of AdeleSia, and Celine Dion.

Anna of Cleves: includes elements of Nicki Minaj and Rihanna.

Katherine Howard: is a blend of young, sexualized pop stars and includes elements of Britney Spears and Ariana Grande.

Catherine Parr: inspired by Alicia Keys and Emeli Sandé.


And have I mentioned the spectacular costumes? These costumes combine elements of Tudor fashion (and architecture in the case of Jane Seymour) with a modern glittery disco aesthetic and I am here for it.

If you want to hear the first song Ex Wives just to give you a flavour, watch the video below:


I learned many things about navigation that day, arriving in Swansea 3 hours and 49 minutes before the show, but this practice made Weston-Super-Mare so much easier.  

I broke the journey down into two parts as it was a longer, more complicated walk from the station to the arena. I stopped half way there to eat lunch at the Slug and Lettuce. Isn't this the most perfect looking exterior for a trip to see a Tudor musical? 


I had allowed so much time I actually got to walk it all the way there, turn around and walk all the way back (very good practice as i do not reverse very well at all and things never look the same going the other way) and then walk back to the arena with more confidence and I still had an hour and a half before the show. 

I treated myself to not one but two programmes

and I bought a sparkly pin badge for my backpack of the Anne Boleyn costumes shown here under a spider, sandwiched between Oz and Cthulhu and above Locke and Key because that's how I roll, baby.


But how was the show, I hear you ask. BRILLIANT. I thought my heart might explode in a shower of gold glitter during the first song and it only got better from there. 

And me being me, I helped my elderly seatmate who had some vertigo (we were on the dead centre of Row X) and we became friends and she has come by the bookshop to say hello and let me help her pick out some Horrible Histories books for her grandkids. 

I have listened to the soundtrack nonstop since I went to see it and there are so many bits that I didn't get before but now have a deeper appreciation for. 

Would I see it again? You betcha. 

And this day of navigating in a bigger city with more complicated streets really set me up for success in Weston-Super-Mare. Also, i realised that the VUE Cinema was right near the arena so if ever something really good is coming to Swansea and not to Carmarthen then I will be able to find my way there and back so that opens the door for future adventures. 

Hoorah and lashings of ginger beer! 

Stay tuned for part three of the WHOLIDAY! 

Thursday, 31 August 2023

Slowly Making a Snail

 Hello Lovelies!

I have wanted to make a Julia Donaldson costume for a while now, but what to choose? The Gruffalo is by far her most famous character but seemed too obvious. My favourite book is Stick Man but that didn’t leave much chance for creativity. About a month ago I was shelving Julia Donaldson books and I came across The Snail and the Whale. Eureka! That was perfect, especially because of Anne, Charlotte and Emily my three Giant African Land Snails collectively known as the Bronte Snails.


I started to scour charity shops for some trousers in brown tones and was lucky enough to find three pairs from the YMCA (£1.50, £1.50, 50p) and then found another pair at the Red Cross for £1.99.

I had literally no idea how big it would need to be as I have no spatial sense, so I used some packing paper at work and laid it out on the floor to get a sense of how long it might need to be. This is about six feet and it only coiled up about this big (see below) so I knew I needed to make it much, much longer.

I carefully cut them into rectangles about two hands wide (because I can’t be arsed to measure properly) and sewed them together in a very long strip, then folded it right sides together and sewed down the side making a very, very, very long snake.

 One of the things I am so glad I did was to leave a gap every ten rectangles (a two-rectangle gap to be precise) to make stuffing it easier.

 Then I tried it on and pretended it was a long scarf and I was Tom Baker (as you do.)

Next I set about to stuffing it. Online people said that bubble wrap was a good thing to use as it was light, but I didn’t have any and it was expensive. The other thing people talked about was scrumpled up paper so that it what I did. I had some brown craft paper I use as wrapping paper so I tore it into long strips and scrumpled it up and used that in  combination with some pollyfill fluff. Then as I filled each section I hand stitched it closed.

 When the whole thing was stuffed it measured an impressive 4.5 meters. I saved back some of the nicest houndstooth tweedy fabric for an art display as my favourite geek merch company Skelton Crew says in the future they will be making the key to 221B Baker Street so I need to be prepared!

 Now it was time to coil that baby up into a huge swirly poop shape. I used safety pins to make this happen. I wasn’t sure how many I would need and as it turns out I needed about 180 and had to go back twice to get more packs. I used the biggest pins at the four carinal directions and the medium ones in all the spaces in between.


Then I needed to attach the straps which in hindsight I probably should have added earlier. I used heavy duty strapping and D Rings to sew (and re-sew about 50 times) to the top and bottom and then added safety pins for extra strengthening.


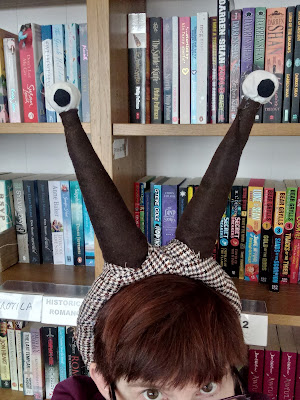
Then onto the eyestalks. I bought a wide headband from Poundland which was surprisingly comfortable (for a headband). I rolled up two squares of brown felt like a cone and stuffed them with more pollyfill fluff. Then hot glued them to the headband and added eyeballs to the top. Then I used leftover scraps to cover the headband to match the shell which made the headband slightly less comfortable because now it was tighter. But a careful strategic stretching and it now feels better.


So how do I put it on? The answer is with some difficulty. I bend over like I am trying to touch my toes with the shell balanced on my back and thread the straps through the D Rings and pull. Then stand up and pull the straps tighter and tie under my boobs.

How was it wearing it all day at work? Not that bad, actually. I did occasionally knock books off the shelf behind me and I could not fit in the cupboard under the stairs so had to get my colleague to bring a few things out (like the cordless phone and spare bags) before he left. Despite the size it was never as uncomfortable as the Medusa crown. I did notice some discomfort the next day between my scapula, but a bit of stretching and lying on my acupressure mat sorted it. 

Now I just need to figure out where to store it as it is quite large….


Saturday, 24 June 2023

Peep Peep! The making of a Very Useful Engine

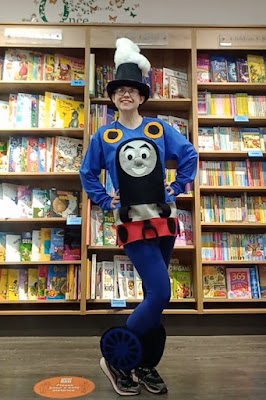
 Hello lovelies! It was Thomas the Tank Engine Day at work today. Many people have asked how I made the costume so I will try to give you a little story of how I did it.

This was one not primarily sourced from charity shops. I had to custom sew it to get the effects I wanted. 

Things I bought or sourced from my fabric stash for the shirt and wheels:

·         A long sleeve blue shirt (I love these Fruit of the Loom shirts. I have lots in various colours. They are a decent price, come in lots of colours and I know what size I need)

·         A silver table runner I bought for £1 at the YMCA

·         Some red poly cotton fabric

·         Black, white, royal blue and yellow felt

I also used lots and lots and lots of Bonda-Web. If you don’t know what this miracle stuff is, it is double sided iron on interfacing. You iron it on the back of your fabric, cut out the shape you want, peel off the paper, then iron your design onto the other bit of fabric (in my case the shirt), then stitch over it. In my experience, Bonda-Web needs top stitching because it will eventually unpeel but is great for holding fiddly designs down without pins so they don’t shift as you try to sew.


I just made stencils for every part of the design then Bonda-Webbed them to the shirt (both front and back)

Then I either machine sewed (the red stripe, the silver stripe, Thomas’s head and body and the number in the box on the back) or hand sewed (the yellow window circles, his eyes, mouth and eyebrows, his accessories at the bottom) them to the shirt. To make his nose 3D I made a circle, sewed around it with a gathered stitch and pulled the circle shut after stuffing it with polyfill fluff. Then I thought my nose was too small so I did it again with a slightly larger circle and stuffed it with fluff as well as the previous too small nose. Then I sewed it by hand to the shirt.

I drew his smile lines with a sharpie. What colour sharpie, you ask? Well, that’s up for debate. I had a grey and a silver. I used the silver on one side, then stopped to make something for my tea, came back and picked up the grey one by accident and then, oh no! The smile lines did not match! After a moment of panic, I carefully traced over the grey line with the silver and then carefully traced over the silver line with grey. Phew! Crisis averted!

I didn’t make the red and silver stripes go all the way to the side seams. I would like to tell you this was because I had anticipated that attaching a non-stretch fabric to a stretchy one would necessitate making a little slit on each side for ease of movement but really I am just crap at measuring and made them a bit too short then couldn’t get it over my hips so had to cut a slit and was thankful I had made a measuring mistake so all’s well that ends well.


To make the ankle wheels I cut out a wheel template in blue and hand stitched it to a black circle while watching Horrible Histories. Then I made some wrapping straps which I sewed to another black circle. Then I pinned and re-pinned on my leg to get a cuff that fit my leg.


Then I sewed Velcro on and made some adjustments—I needed a little dart on one side and a corner clipped but now they fit my leg perfectly.

Then I hand sewed the circle on the leg band to the wheel circle and inserted a slightly smaller circle of cardboard (gold carboard in this case as it is what I had used to spray paint my Medusa crown).

View from the top:


Then on to the hat. The steam coming out has impressed a lot of folks so how did I do it?

I bought:

A stovepipe hat (taller than a top hat) and some invisible hairnets like a dinner lady might wear.


Then I carefully stuffed polyfill fluff into a hairnet and sewed it closed then attached it to a piece of felt. Then I hot glued the felt to the top of the hat. I kept filling hairnets with fluff and using hot glue and tiny stitches to hold them together.

I am very pleased with how it came out. The only slight drawback is I don’t think the shirt cannot be washed. But having spent time in the theatre I know you can just spray it with a bit of Dettol or Lysol and call it square.

What will I make next? Stay tuned!

Wednesday, 3 May 2023

The Hiss-tory of Medusa

 Hello lovelies! 

I have been wanting to make a Medusa costume for years. Even though she can turn people to stone by looking into their eyes I believe she is a tragic figure. I mean, she didn’t start off all snaky, did she? No. She was raped by Poseidon in the temple of Athena and Athena punished her by making her hideous and so that no man could ever love her. Victim blaming much?

To start this costume, I needed some snakes. I started going around to charity shops to see if there were any rubber snakes about. Carmarthen Free Books gave me one they had been hiding around the shop to scare each other (which made me laugh as that was one of the many games that Spiderman and I played). A few friends posted me some rubber snakes they found in their house. A lovely customer came by with a few (and then a few days later a few more). I bought a packet of small ones from Amazon. Now we were set!

Most of the tutorials I found had them attached to a hair band. I was worried that would be unsteady and slide off every time I looked down. I planned to wear it at work and hopefully to Swansea Comic Con so it needed to be comfortable and stable.


I decided to build a bespoke crown to the shape of my head with support straps over the top. I bought 2 dog leads from Poundland (£2 each—when did Poundland stop selling everything for a £1??) and created a base.


Then I used some tiara bits I got at Poundland for £1 and used hot glue and wire to attach to the sides to give the snakes some scaffolding to hold onto.

front

Then I started draping the snakes and using hot glue and wire to keep them in place.

back
Next I had to wait until it stopped raining to go outside and spray paint them gold! My friendly customer also gave me a huge heavy snake which works perfect as a necklace.

I am really pleased with the results. My only issue is that it is a bit heavier than I intended. It weighs about 500g (a little over a lb/pound!) but luckily it sits very well balanced on my head. I added strips of black felt in the inside so any wires wouldn’t poke my head. I also decided to wear the black chiffon scarf under it to give the illusion of long hair but also be able to hide any padding I might hide under the crown.

VERDICT: I *love* the way it looks but it was very heavy. I don't think it will suitable for Comic Con but it definitely works for one Saturday a year dressing up at work. I think I just got carried away adding snakes, but I am very proud of how it turned out. 

Friday, 10 March 2023

I made a Thing

 Hello lovelies! My life has been really busy at the moment with some good and some bad things, but one of the good things is that I have been able to make some incredible crafts for various costumes for work. 

I am working on a Wednesday Addams costume to wear to work on our dress up Saturdays. I managed to find all the clothing  at local charity shops and then I ordered a wig from EBAY. But I really wanted a Thing hand to use as a prop in the photo shoot. However looking online they were hella-expensive. Like between £30 and £60 and I was NOT gonna pay that just for a quick prop.

So what is a crafty Spidergrrl to do but make one herself.


Is it perfect? No. But is it pretty good? yeah. 

So how did I make it? 

First I bought a pair of tan PU leather (meaning not from animals) gloves from EBAY for £2.99.


Then I drew on them in red sharpie where I wanted the scars to be be. While the ink was wet I smudged it with my finger to make the lines blurry.


Then I used black embroidery floss to stitch it up. I had to cut the glove down the side to be able to reach all the places on the back of the hand, but that was fine. I just stitched up the side when I was done.

Next I added some wire into a disposable glove. I put wire in all the fingers and then taped it down at the wrist. Then I carefully inserted the wired glove into the Thing glove. This was so Thing's fingers could bend. I taped a few wires on the other side of the glove to help the wrist be able to move a bit more when it was done.


Then I filled the wired glove inside the Thing glove with uncooked rice. This was to weigh it down and make it heavy but also keep it flexible. It took ages as I could only do a few spoonfuls at a time and had to use a pencil to push rice all the way into each finger. 


Next I hot glued a circle of cardboard with little fold up flaps to stick it to the sides of the glove to keep the rice from falling out and keep the wrist from collapsing. I forgot to take a photo of this so you will just have to use your imagination.

Lastly I used the Thing to trace a circle the same size as the open top from the other glove, cut it out and sewed it to the open top to close off the wrist. I decided it needed fingernails so I used a brown sharpie to draw some dirty nails and then smudged the wet ink.

And voila!


It doesn't have a huge amount of flexibility, but it has enough to do what I wanted. The fingers bend down, the wrist bends up. It looks quite good and  I spent about £3 and two hours to make it which sure beats £30-£60. 

I plan to wear the Wednesday Addams costume sometime in May when the weather is warmer as it isn't the sort of costume that can fit a lot of layers underneath. Watch this space!