Showing posts with label crafts. Show all posts

Thursday, 31 August 2023

Slowly Making a Snail

 Hello Lovelies!

I have wanted to make a Julia Donaldson costume for a while now, but what to choose? The Gruffalo is by far her most famous character but seemed too obvious. My favourite book is Stick Man but that didn’t leave much chance for creativity. About a month ago I was shelving Julia Donaldson books and I came across The Snail and the Whale. Eureka! That was perfect, especially because of Anne, Charlotte and Emily my three Giant African Land Snails collectively known as the Bronte Snails.


I started to scour charity shops for some trousers in brown tones and was lucky enough to find three pairs from the YMCA (£1.50, £1.50, 50p) and then found another pair at the Red Cross for £1.99.

I had literally no idea how big it would need to be as I have no spatial sense, so I used some packing paper at work and laid it out on the floor to get a sense of how long it might need to be. This is about six feet and it only coiled up about this big (see below) so I knew I needed to make it much, much longer.

I carefully cut them into rectangles about two hands wide (because I can’t be arsed to measure properly) and sewed them together in a very long strip, then folded it right sides together and sewed down the side making a very, very, very long snake.

 One of the things I am so glad I did was to leave a gap every ten rectangles (a two-rectangle gap to be precise) to make stuffing it easier.

 Then I tried it on and pretended it was a long scarf and I was Tom Baker (as you do.)

Next I set about to stuffing it. Online people said that bubble wrap was a good thing to use as it was light, but I didn’t have any and it was expensive. The other thing people talked about was scrumpled up paper so that it what I did. I had some brown craft paper I use as wrapping paper so I tore it into long strips and scrumpled it up and used that in  combination with some pollyfill fluff. Then as I filled each section I hand stitched it closed.

 When the whole thing was stuffed it measured an impressive 4.5 meters. I saved back some of the nicest houndstooth tweedy fabric for an art display as my favourite geek merch company Skelton Crew says in the future they will be making the key to 221B Baker Street so I need to be prepared!

 Now it was time to coil that baby up into a huge swirly poop shape. I used safety pins to make this happen. I wasn’t sure how many I would need and as it turns out I needed about 180 and had to go back twice to get more packs. I used the biggest pins at the four carinal directions and the medium ones in all the spaces in between.


Then I needed to attach the straps which in hindsight I probably should have added earlier. I used heavy duty strapping and D Rings to sew (and re-sew about 50 times) to the top and bottom and then added safety pins for extra strengthening.


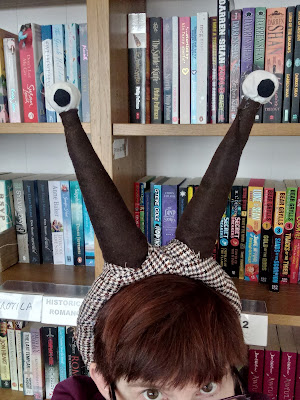
Then onto the eyestalks. I bought a wide headband from Poundland which was surprisingly comfortable (for a headband). I rolled up two squares of brown felt like a cone and stuffed them with more pollyfill fluff. Then hot glued them to the headband and added eyeballs to the top. Then I used leftover scraps to cover the headband to match the shell which made the headband slightly less comfortable because now it was tighter. But a careful strategic stretching and it now feels better.


So how do I put it on? The answer is with some difficulty. I bend over like I am trying to touch my toes with the shell balanced on my back and thread the straps through the D Rings and pull. Then stand up and pull the straps tighter and tie under my boobs.

How was it wearing it all day at work? Not that bad, actually. I did occasionally knock books off the shelf behind me and I could not fit in the cupboard under the stairs so had to get my colleague to bring a few things out (like the cordless phone and spare bags) before he left. Despite the size it was never as uncomfortable as the Medusa crown. I did notice some discomfort the next day between my scapula, but a bit of stretching and lying on my acupressure mat sorted it. 

Now I just need to figure out where to store it as it is quite large….


Saturday, 24 June 2023

Peep Peep! The making of a Very Useful Engine

 Hello lovelies! It was Thomas the Tank Engine Day at work today. Many people have asked how I made the costume so I will try to give you a little story of how I did it.

This was one not primarily sourced from charity shops. I had to custom sew it to get the effects I wanted. 

Things I bought or sourced from my fabric stash for the shirt and wheels:

·         A long sleeve blue shirt (I love these Fruit of the Loom shirts. I have lots in various colours. They are a decent price, come in lots of colours and I know what size I need)

·         A silver table runner I bought for £1 at the YMCA

·         Some red poly cotton fabric

·         Black, white, royal blue and yellow felt

I also used lots and lots and lots of Bonda-Web. If you don’t know what this miracle stuff is, it is double sided iron on interfacing. You iron it on the back of your fabric, cut out the shape you want, peel off the paper, then iron your design onto the other bit of fabric (in my case the shirt), then stitch over it. In my experience, Bonda-Web needs top stitching because it will eventually unpeel but is great for holding fiddly designs down without pins so they don’t shift as you try to sew.


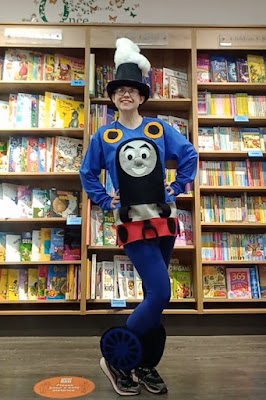
I just made stencils for every part of the design then Bonda-Webbed them to the shirt (both front and back)

Then I either machine sewed (the red stripe, the silver stripe, Thomas’s head and body and the number in the box on the back) or hand sewed (the yellow window circles, his eyes, mouth and eyebrows, his accessories at the bottom) them to the shirt. To make his nose 3D I made a circle, sewed around it with a gathered stitch and pulled the circle shut after stuffing it with polyfill fluff. Then I thought my nose was too small so I did it again with a slightly larger circle and stuffed it with fluff as well as the previous too small nose. Then I sewed it by hand to the shirt.

I drew his smile lines with a sharpie. What colour sharpie, you ask? Well, that’s up for debate. I had a grey and a silver. I used the silver on one side, then stopped to make something for my tea, came back and picked up the grey one by accident and then, oh no! The smile lines did not match! After a moment of panic, I carefully traced over the grey line with the silver and then carefully traced over the silver line with grey. Phew! Crisis averted!

I didn’t make the red and silver stripes go all the way to the side seams. I would like to tell you this was because I had anticipated that attaching a non-stretch fabric to a stretchy one would necessitate making a little slit on each side for ease of movement but really I am just crap at measuring and made them a bit too short then couldn’t get it over my hips so had to cut a slit and was thankful I had made a measuring mistake so all’s well that ends well.


To make the ankle wheels I cut out a wheel template in blue and hand stitched it to a black circle while watching Horrible Histories. Then I made some wrapping straps which I sewed to another black circle. Then I pinned and re-pinned on my leg to get a cuff that fit my leg.


Then I sewed Velcro on and made some adjustments—I needed a little dart on one side and a corner clipped but now they fit my leg perfectly.

Then I hand sewed the circle on the leg band to the wheel circle and inserted a slightly smaller circle of cardboard (gold carboard in this case as it is what I had used to spray paint my Medusa crown).

View from the top:


Then on to the hat. The steam coming out has impressed a lot of folks so how did I do it?

I bought:

A stovepipe hat (taller than a top hat) and some invisible hairnets like a dinner lady might wear.


Then I carefully stuffed polyfill fluff into a hairnet and sewed it closed then attached it to a piece of felt. Then I hot glued the felt to the top of the hat. I kept filling hairnets with fluff and using hot glue and tiny stitches to hold them together.

I am very pleased with how it came out. The only slight drawback is I don’t think the shirt cannot be washed. But having spent time in the theatre I know you can just spray it with a bit of Dettol or Lysol and call it square.

What will I make next? Stay tuned!

Wednesday, 3 May 2023

The Hiss-tory of Medusa

 Hello lovelies! 

I have been wanting to make a Medusa costume for years. Even though she can turn people to stone by looking into their eyes I believe she is a tragic figure. I mean, she didn’t start off all snaky, did she? No. She was raped by Poseidon in the temple of Athena and Athena punished her by making her hideous and so that no man could ever love her. Victim blaming much?

To start this costume, I needed some snakes. I started going around to charity shops to see if there were any rubber snakes about. Carmarthen Free Books gave me one they had been hiding around the shop to scare each other (which made me laugh as that was one of the many games that Spiderman and I played). A few friends posted me some rubber snakes they found in their house. A lovely customer came by with a few (and then a few days later a few more). I bought a packet of small ones from Amazon. Now we were set!

Most of the tutorials I found had them attached to a hair band. I was worried that would be unsteady and slide off every time I looked down. I planned to wear it at work and hopefully to Swansea Comic Con so it needed to be comfortable and stable.


I decided to build a bespoke crown to the shape of my head with support straps over the top. I bought 2 dog leads from Poundland (£2 each—when did Poundland stop selling everything for a £1??) and created a base.


Then I used some tiara bits I got at Poundland for £1 and used hot glue and wire to attach to the sides to give the snakes some scaffolding to hold onto.

front

Then I started draping the snakes and using hot glue and wire to keep them in place.

back
Next I had to wait until it stopped raining to go outside and spray paint them gold! My friendly customer also gave me a huge heavy snake which works perfect as a necklace.

I am really pleased with the results. My only issue is that it is a bit heavier than I intended. It weighs about 500g (a little over a lb/pound!) but luckily it sits very well balanced on my head. I added strips of black felt in the inside so any wires wouldn’t poke my head. I also decided to wear the black chiffon scarf under it to give the illusion of long hair but also be able to hide any padding I might hide under the crown.

VERDICT: I *love* the way it looks but it was very heavy. I don't think it will suitable for Comic Con but it definitely works for one Saturday a year dressing up at work. I think I just got carried away adding snakes, but I am very proud of how it turned out. 

Friday, 10 March 2023

I made a Thing

 Hello lovelies! My life has been really busy at the moment with some good and some bad things, but one of the good things is that I have been able to make some incredible crafts for various costumes for work. 

I am working on a Wednesday Addams costume to wear to work on our dress up Saturdays. I managed to find all the clothing  at local charity shops and then I ordered a wig from EBAY. But I really wanted a Thing hand to use as a prop in the photo shoot. However looking online they were hella-expensive. Like between £30 and £60 and I was NOT gonna pay that just for a quick prop.

So what is a crafty Spidergrrl to do but make one herself.


Is it perfect? No. But is it pretty good? yeah. 

So how did I make it? 

First I bought a pair of tan PU leather (meaning not from animals) gloves from EBAY for £2.99.


Then I drew on them in red sharpie where I wanted the scars to be be. While the ink was wet I smudged it with my finger to make the lines blurry.


Then I used black embroidery floss to stitch it up. I had to cut the glove down the side to be able to reach all the places on the back of the hand, but that was fine. I just stitched up the side when I was done.

Next I added some wire into a disposable glove. I put wire in all the fingers and then taped it down at the wrist. Then I carefully inserted the wired glove into the Thing glove. This was so Thing's fingers could bend. I taped a few wires on the other side of the glove to help the wrist be able to move a bit more when it was done.


Then I filled the wired glove inside the Thing glove with uncooked rice. This was to weigh it down and make it heavy but also keep it flexible. It took ages as I could only do a few spoonfuls at a time and had to use a pencil to push rice all the way into each finger. 


Next I hot glued a circle of cardboard with little fold up flaps to stick it to the sides of the glove to keep the rice from falling out and keep the wrist from collapsing. I forgot to take a photo of this so you will just have to use your imagination.

Lastly I used the Thing to trace a circle the same size as the open top from the other glove, cut it out and sewed it to the open top to close off the wrist. I decided it needed fingernails so I used a brown sharpie to draw some dirty nails and then smudged the wet ink.

And voila!


It doesn't have a huge amount of flexibility, but it has enough to do what I wanted. The fingers bend down, the wrist bends up. It looks quite good and  I spent about £3 and two hours to make it which sure beats £30-£60. 

I plan to wear the Wednesday Addams costume sometime in May when the weather is warmer as it isn't the sort of costume that can fit a lot of layers underneath. Watch this space! 

Friday, 1 January 2021

2021 Vision

 Hello lovelies! Happy new year! 2020 was rollercoaster year, wasn't it? But it did allow me to see some things clearly:

1. I need routine. And it is hard to impose it on myself, but I must try harder especially as we are yet again in lockdown. 

2. I love my job. I mean I REALLY love my job. I miss it when I can't go to work. I am more productive and happier when I have been at work. I have a really good work-life balance and like to be having both halves of work and life. 

3. I am recharged by interacting with people. I knew this before, but I REALLY learned it over the big lockdown. The Amazing Spiderman is perfectly happy working from home as people drain him, but I was like a flat battery for months. I don't ever want to go out in big noisy groups in crowded spaces (not even before COVID) but I really thrive on some one on one conversations. I like meeting a friend for a hot chocolate in an independent café or going for a picnic in the park to save money. I also really enjoy interacting with customers. We have lots of regulars who pop in regularly (that is the definition of a regular, Spidergrrl!) that I look forward to seeing. Interacting with customers and being helpful is a huge part of my happiness. 

4. I have some control issues. Quite a lot of control issues, and this year has been out of control which has been really hard to cope with. This also ties in with routine because  with Spiderman working from home I could not keep to the routine I liked and found it very hard to take his suggestion to "please just do that some other time." 

5. I have trouble accepting help. I am often out helping people while my battery is on low (another issue I am continually working on) but find it harder to allow someone to help me. My dear old dad once said to me, "Why are you making things harder for yourself?" to which I replied "But it is so much easier to make things difficult!" by which I meant it is so much easier to do it myself that to ask for help. More on this in a bit. 

6. I am not good at sharing. I need my own computer. This was a serious issue during the big lockdown. I am a writer. Blogging takes up a lot of time and research and I am an author who needs to work on her own stories. This was a HUGE issue between myself and the Amazing Spiderman over the big lockdown. I was like Vesuvius waiting to erupt, always boiling and seething under the surface as we both needed to be on the computer at the same time but in the rock/paper/scissors of life--work trumps personal reasons. We have solved this by investing in a second laptop and it has CHANGED MY LIFE. I have written more in the last two months than in the whole rest of the year. 

7. I need more creative outlets. This too was a struggle during the big lockdown when I couldn't go to work.  I started to think about what made me happy and what I missed from my life in England when I worked in a school. There was lots of time for laying about ruminating on what I enjoy that I was not allowed to do while I waited (im)patiently for my turn on the computer. Once I determined what it was, I made damn sure to start doing it the moment I got back to work. More on this later. 

Having gained some extraordinary insight into myself in 2020, I wanted to reflect that in my Vision Board.

What is a Vision Board, I hear you cry? Well, it is part woowoo, part arts and crafts. I like to really think on new year's day what I want to do in the upcoming year and who I want to be (striving always to be a better person). It is not about new year's resolutions--which are easily broken--but just some personal growth goals and a reminder of what makes me happy. By making a tangible reminder of what brings me joy, I can make sure to do it. I then hang it in a prominent place in my craft room and look at it every morning to remind me of what it is important. 

Want to see it? Of course you do.


So what am I doing this year? In no particular order:

1. Being vegan--this is the core of my values. Does it cause death and suffering? Then it is to be avoided. Does it bring life and kindness? Then it is to be celebrated. Compassion is so much better than cruelty. 

2. What am I doing in the world to make it better? Making sure to look for opportunities to make a difference in the world. This has been more important in lockdown....how can help others (making sure that what I choose to do energises me rather than depletes me--setting boundaries.) 

3. I am the chief cook in our house, but this was not always so. When we were first married and I was a full time student and then a full time teacher with a terrible work-life balance, Spiderman did all our cooking. When I wanted to become vegan I learned how to cook (and cook well!) Spiderman is a great cook. he is just much slower than me. I swear the man gets a ruler out when he chops potatoes as they are all identically sized! Since I am often tired from work, he has offered many times to share the burden of cooking. I do not take him up on it nearly as often as I should and then feel resentful as I am tired or my back hurts and it is me doing it. We had a long talk about this and I am going to work harder to relinquish some control in the kitchen. So in 2021, we will be taking turns more. We also will be cooking together more. I can do food prep MUCH faster while we chat about our days and then I can bugger off and do some yoga or have a nap while he does the cooking. Also, I want to make sure to do more advance food prep to make cooking for whoever's turn it is, easier. 

4. Keeping to a loose routine especially in times of lockdown. I don't have to do EVERYTHING in a day, but it would be nice to tick a few things off my enjoyment list (see below) every day. Also writing down a few things in my 2021 diary that I would like to accomplish (or need to be done--I cannot tell you the amount of times I have realised at midnight that something needed to be done for the morning.)  Better organisation and loose routine (especially in lockdown) but also for when I am working to use my time more wisely. 

5. Doing things that bring me joy--making crafts and creating art, reading (and discussing--this year Spiderman will be a judge for the Carnegie and Greenaway awards and so we will get upwards of a hundred books to read and talk about...I made us our own little book club symbol!), making films with my new stop motion animation app. These are all things I am doing for me...but there are several things I do at home that bring me joy that involve work. Sewing fancy dress costumes to wear at the Bookshop (after the big lockdown I have gone to work dressed as Hercule Poirot, the witch from Narnia and a Christmas elf) as well as storytelling. I realised how much I missed storytelling--the research of finding a story that feels right in my mouth, adapting it, memorising it, making costumes or props for it, performing it. Right now it is not possible to have children in the shop for an actual audience but we have gotten round this by having my faithful camera crew Spiderman film me telling tales. Which leads me neatly on to my next intention.

6. DIY. I used to be such a luddite--I only got my first smartphone in 2017 and I always feel like I am behind on technology but this year I taught myself to build a website because some friends with an animal sanctuary needed help. I also taught myself to use video editing software so that we could put up films of my storytelling on the the Goldstone Books YouTube Channel. I used to think that I was not smart enough to do "computer things" but it turns out I was wrong. So this year, with my new laptop that I don't have to share, I am finally working on a project that has been on hold since 2016--turning my epistolary novel into a graphic novel. Yes, I will be teaching myself how to illustrate online by using my my new tech skills to tell my story. Then we will publish my second book! Hoorah! 

7. Coming out of the big lockdown (but still in cautious mode) I was reminded who was in my tribe and who I enjoyed spending time with and who I hadn't missed at all. There are several people I let fade away because they drained me and several people I made an active effort to spent (socially distanced) time with because they energised me. Even now, in our third lockdown, I am making time to have phone calls and texts with people I care about (or send make and send a card if they are struggling) and that connection is keeping my going. 

8. The lockdowns put such a strain on small businesses and several independent vegan businesses have had to close. I work for an independent bookshop and I am all too aware of the national chain right down the road who can sell at a bigger discount than we can. I tried last year to support more small businesses (especially ones that help us cut our waste) and this year I will try even harder. We just booked in an order with Cegin Mam Gu for a three course Greek meal that is vegan and GF and delivered to our door which I am very much  looking forward to since we can't go out for a meal. Which leads me to my next point.

9. Drink more tea. This ticks the box of supporting Tea Traders ( a great independent business in town run by two lovely blokes which sells loose tea) as well as keeping me hydrated. Fruit tea is good hot or cold and I am guaranteed to have less pain and be less cranky if I am drinking some delicious tea.  

10. The self care checklist. Even just 15 minutes a day makes all the difference in my physical and emotional wellbeing. Yoga and strength training for my body (I have let my ab work go this year and I feel it in my lower back), deep breathing and mindfulness (I tend towards hyperventilating and overthinking), more orgasms (they are truly the best pain relief and mood booster I know) and a 15 minute tidy every day instead of letting things pile up until it takes hours to put everything back where it belongs will save my sanity. 

11. Patience. About everything.  Enough said.  

What did you learn about yourself in 2020? What do you hope to do with your life in 2021? 

Wednesday, 26 August 2020

Crafty Corner--my new phone holder

 Hello lovelies! I have been crafting like crazy lately, thanks to my friend Kirsty who found me several huge bags of curtains, duvet covers and sheets for fabric. It has inspired me to finally get in there and reorganise my craft room for easier project making. I bought several hugh-jass clear storage tubs at B&M Bargains for all my new fabric and I found all kinds of stuff I didn't even remember I had.

I have been working with clay, painting rocks and sewing this week after work and it feels great.

During lockdown I noticed that my phone case was beginning to go. I knew I wanted to craft a replacement but wasn't sure how to do it. While I was home with no place to go, I watched dozens of tutorials about how people made phone cases.

I had a great idea to make a little slip in envelope sort of case made from a men's necktie which was absolutely adorable, but extremely impracticable. I am a butterfingers. There is a reason i have the sort of case that is like a little book with a front cover because I drop my phone ALL THE TIME. I tried sewing a little pocket one and promptly dropped my slippery as an eel phone the moment I tried to get it out of its cute little envelope. I decided it would made a cute i-pod holder instead. 

So I began to look at only tutorials for the flip case style. This is what I found.

Some were paper--a terrible idea in wet Wales.

Some were cloth with cardboard inside for stiffness--also a bad idea in the country that never seems to stop raining.

Most were just glued together/no sew--I wanted to do a combination of sewing with a bit of gluing.

Some had little tiny strips of elastic in the corners to precariously hold your phone in--yeah, that is an accident waiting to happen.

Finally, I was allowed to go back to work and I just put up with my slightly raggedy phone case while i pondered and schemed. Finally--as so many good ideas do---it came to me in a dream.

Not a crack-ass dream but a craft-ass dream. I could use the little snap-in case that sits in the book part of the case and craft around it. No precariously placed strips of flimsy elastic for me! I could sew a cover and cut a little peephole for the camera. I could fill it with a bit of a soft old blanket to give it some padding and then instead of cardboard, I could use some craft foam that I found in my clean up. It would give it some flexible, waterproof stability.

I dug out this pretty fabric that came from a  sort of Indian-print throw and started planning. I added iron on interfacing for stiffness and used my phone case as a tracing pattern. I debated about adding little pockets but 1) that would be a faff and 2) I never really used them on my old phone case. 

I decided to add the classic button and elastic clasp because it is easy to make and looks nice. Who doesn't love a big decorative button??? 

Here it is: Ta-da!


 In the inside after sewing, I hot glued the slip-in case from my old phone case because it was still in good condition.


Now, here it is with the phone in--I really need to clean my screen. Also, this would be a good time to mention that is is impossible to take a photo of your phone with your phone. I had to resort to the camera and then tediously download it and edit it on the computer. My phone makes taking pictures so much easier!


I also closed it with a very nice rolled edge that I hand sewed. 

Now from the back--peek-a-boo! 


I am really proud of it...it is beautiful and hand made and exactly like how it was in the dream. It is soft to cushion the inevitable falls and when it wears out I will be able to make another one. I love that it is made from upcycled materials and it cost me nothing to make. 

Hoorah for crazy crafts! 

Thursday, 1 December 2016

Three Little Pigs From Home Are We

Just a quick one to show off a project I have been working on for the last week or so.

Our friends Iain and Rachel have had a baby (an adorable daughter named Hazel Gail) and I wanted to make a gift for their son Kieran who is officially a big brother!

For his big brother gift, they bought him a puppet theatre so I thought I should make some puppets to go with it.


I am super stoked at how they came out. They were really fun to make. I picked the story of the Three Pigs because it is a good one for practising sequencing and repetition with the lines 
Wolf: Little pig, little pig, let me come in
Pig: Not by the hair of my chinny-chin-chin.
Wolf: Then I'll huff and I'll puff and I'll blow your house in! 

Plus there is a matching element. Did you see what I did there? Each pig wears a bow tie made of the same colour as their house. 

Lest you think I left wee Hazel out, I did make a beautiful (if I do say so myself) hot air balloon mobile for her cot that I completely neglected to get a photo of before I posted it. 

And I will say that I had so much fun making these puppets (and playing with these puppets, if I am honest) that I might make myself a set!

Happy playing, Kieran! 

Friday, 18 November 2016

Potions 101, part two

Hello fellow crafters and genuinely lovely people! A few weeks ago I made some Harry Potter potion labels. You can read about it here:
http://spidergrrlvstheworld.blogspot.co.uk/2016/11/potions-101.html

I said in that post I had two more potions to make, but was waiting to find the right bottles.

Well, the bottles have been found!

Thanks especially to our friends the Haboobys who generously dug up bottles half submerged in mud near a stream on their property and then brought them to me. I could not have made these two potions without your help. Thanks for giving me your rubbish!

So here is the first one:


This one is made from an old bottle of rum. Fifteen men on a dead man's chest. Yo ho ho and a bottle of rum and all that cliche rot. 

Here is the second one: 

 Floo powder! Made from ....real flue powder! Here is where I got our other friends involved. Our friends Kathryn and Peter have a wood burning stove and so i asked them if they could please bring me a small bag of ash.

Many hilarious texts were passed back and forth about me getting coals and switches in my Christmas stocking since I was so keen on getting a bag of ash.

Now, let me just say Kat and Pete are the classic definition of a wind-up merchant. What is a wind-up merchant, I hear you cry? Well, my fellow American peeps (excuse me, I mean my fellow "Canadian" peeps)  A Wind-up merchant is someone who enjoys winding others up in the sense of making fun of them or playing practical jokes. You know the sort of people I am referring to, don't you?

Anyway, they kindly delivered my bag of ashes along with a note that read:

My grandmother was very keen on art too, and she would be very pleased to know her ashes were a part of an art project. She also liked water, so if there are any of her ashes left, please can you scatter them in the river Towy. 

I was also told she was a tiny woman which is why there there was only a small bit in the bag.

See what I mean?

We have such mad friends...which mean we fit right in. (ha ha)

Anyway, now my Harry Potter collection is complete!

This is a fun project to do that is relatively cheap, especially if someone else gives you all their old bottles and a bag of ash.

Thanks friends!

Diolch ffrindiau!

Merci amies!

Friday, 4 November 2016

Potions 101

I have been having a major crafty renaissance at the moment. Just crafting my little heart out. Lots of new ideas just pop into my brain and I. Must. Make. Them. Now.

However, this craft has been brewing and stewing for months.

Months, I tell you.

I wanted to decorate some bottles with the potions labels from the Harry Potter franchise. I am no stranger to bottle decorating.

Exhibit A:


Exhibit B:


Exhibit C:


But when we were visiting with our Louisiana friends The Petersons  who were here on holiday over the summer, I got this idea. We met them at the Doctor Who Experience in Cardiff and they had already done the Harry Potter studio tour experience which Spiderman and I did a few years back. We had a big ole geeky time with them and I got to thinking about this project. The thing that impressed me most about the Harry Potter tour was the potions classroom with all those fantastically labelled bottled.

I thought: I could do that. 

My previous attempts were printed on parchment paper and had utilised the torn edges idea to make it look old. I also inked the edges with a brown sharpie to give it definition. Then I just used watered down PVA glue (Elmer's glue to my American peeps) to glue the labels on. Easy peasy.

This time I wanted to try something different.

But first I had to
ponder
practice
collect

I did a lot of pondering as to what potions I wanted to make. I spent hours looking on google to see what others had done. I found some that were free printables which were awesome and (if I'm honest) probably better than the ones i could do, but I wanted it to be a self made project, not a copied project.

I have *just* learned how to use borders and text boxes and so i wanted to practice my computer skills and make the labels.

Throughout this whole pondering and practising time, I was collecting  interesting bottles. I was asking people to raid their recycling for me. When I felt like I had enough bottles that seemed to fit my labels then I was ready to begin.

I also printed them on parchment paper as it helps right away to give them an antiqued look.


I normally prefer clear bottles so you can fill them with coloured water (see below) but I really liked that brown bottle and Wolfsbane seemed like a good choice to be in a brown bottle. 


You may notice that two bottles have lids and two bottles have corks. I have a confession to make.

The corks are fake (I made those, too)

It was a bit of "needs must" as two really good shaped bottles had had bottle caps and were lidless.  I tried to buy corks. 

You can't.

I tried to ask friends who drank alcohol to save me their corks.

They couldn't because wine comes with screw tops today, unless you buy the posh stuff. (my friends don't buy the posh stuff.) 

So i rolled up some aluminium foil into a cork shape and then used  torn strips of  parchment paper that I had previously thrown in the bin after cutting out the labels.  I just used the leftover PVA glue (Top Tip: store your watered down glue in a jar with a lid and it will last for months and so when the urge to do some crafting comes over you, you can make it at a moment's notice) and papier-mached the foil til it was all covered with parchment paper. It still didn't look *quite* right so i used my secret cheap-ass theatre technique to stain the corks.

Shhhh.....don't tell anyone. This is our little crafty secret.

Brown shoe polish.

Seriously, this stuff makes a great antique stain. Rub some on with a paper towel and then buff it off. It gets into cracks and crevices and makes something look old and I got a tin for £1. On the down side, it stinks a bit. That's from the petroleum. On the upside, it's vegan. It uses carnauba wax not beeswax. 

So now they reside in the window catching light (and undoubtedly catching dust) but I love them and am proud of them and I still have two more labels (one for Skele-Gro and one for Floo Powder) that i am just waiting for the right bottles to appear.

I've got my glue saved in a jar, so I can be ready at a moment's notice.

What are you making?

Friday, 11 December 2015

A Very Special Birthday

Hello peeps! it has been a long time since I wrote on the blog. I could use some lame excuse, but I know you won't fall for it.  Basically, I have been busy and lazy.


But today is my 46th birthday and though I have been super busy, i wanted to take a moment to say what I am grateful for.

What started out as a joke has turned into reality--I am having a week long birthday celebration.

Last weekend, our dear friend Karen came to visit us from Newcastle. Although she lives in New York, she and her family often visit the UK and so we have seen them many times, but this year she is living and working in Newcastle on a Leverhulme fellowship. She kindly spent eight hours on a train to spend a weekend with us. It is always such a joy to spend time with her. I had a 24 bug for the first day and spent most of Saturday lying on the floor because sitting up made me dizzy, but by Sunday I was right as rain and we had a lovely nearly seven mile walk together through town.
from abitofthegoodstuff.com

Yesterday we met with 12 vegan friends and had Christmas lunch at the local cafe. It was good food, good friends and good fun. I am so thankful we have managed to form such deep friendships in such a short time.

When we got home there was a hilarious message on our ansaphone of my mum pretending to be my Aunt Icy. For those of you not in the family, Aunt Icy used to phone you up and sing Happy Birthday in a slow, melodramatic, operatic voice.  The message cracked me up because it was an uncanny likeness and it was a day early which is a testament to my grandmother on my other side. Every year she would phone me on the 10th and say, "I cannot recall whether your birthday is the 10th or the 12th so i am phoning today." In reality--it was neither. it is the 11th. But try and tell her that and she would turn up her hearing aide and pretend she could not hear you.

Today (my actual-smactual birthday) was spent with those munchkins that I tutor. I adore these funny vegan kids and love being their home-education teacher once a week. I was gifted with lots of beautiful homemade gifts.

They were all handmade including the wrapping although M asked me if she could keep some of the wrapping because she wanted to reuse the sparkly paper.

Here they are together. Sorry for the accidental selfie--i can see myself reflected in the glass.

Here are the gifts from M aged 7--a bracelet that she made me and a little angel made from a clothes peg. Also a lovely card with lots of flowers and fairy cakes sellotaped on.

Here is the gift from H aged 9--a haiku poem written on the back of a cereal box (because he couldn't find any paper) and put into a frame. Please excuse the accidental selfie reflected in the glass.


If you can't read it it says:
Now it's your birthday
the best teacher in the world
Heather, that is you!

These gifts have won my heart. Who doesn't love homemade gifts?

So today was our home education Christmas party. We made some Snowman Snacks. 

Snowman Snacks
You need:
2 rice cakes
vegan cream cheese
raisins
a bit of carrot
some fruit leather like Yo Yo bears

1. Spread the rice cakes with cream cheese.
2. Use raisins for the eyes and buttons. We also used raisins to make a smile.
3. Use a bit of carrot for the nose.
4. Cut some fruit leather to make a scarf.
Eat and enjoy!


They were easy enough to make that their little brother A was able to join in and help.  Then A went to play downstairs and we made some ornaments.

it basically involved sewing on a button and then sewing around the edges and stuffing with fibrefill. They came out really cute and the kids were really proud. M sews a lot but H had never done so.. He sometimes has very specific gender roles in his head (don't know where he gets it--not from home) and i think sometimes *wants* to do certain things but if they are perceived by society as *girl* things he is not too sure. I said sewing was for everyone and sewing on buttons is a lifeskill. By the end he was really enjoying himself and muttering, "Sewing is for everyone. Anyone can do sewing."

We had a brilliant time. Tonight when Spiderman came home from work he brought me a pressie. I wasn't expecting a gift and he wasn't planning to buy me a gift, but he saw it in the window of a wee Five and Dime shop in Lampeter. He knew I would love it.

OMG! A spirograph! It's the 70's all over again!!!!! Back to my childhood!!!! There was also a badge which reads it's my birthday which I refuse to take off. 

 Tomorrow we will decorate the tree, make leek and potato soup and watch the Muppet's Christmas Carol.  Sunday we will go to see the pantomime of Sleeping Beauty and then out for a Chinese meal at our friend Soong's restaurant.

A big festival of me! With friends, food and fun. What more could a person ask for?