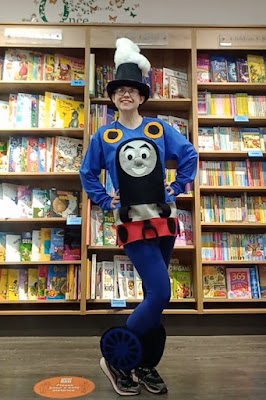
Hello lovelies! It was Thomas the Tank Engine Day at work today. Many people have asked how I made the costume so I will try to give you a little story of how I did it.
This was one not primarily sourced from charity shops. I had to custom sew it to get the effects I wanted.
Things I bought or sourced from my fabric stash for the shirt
and wheels:
·
A long sleeve blue shirt (I love these Fruit of
the Loom shirts. I have lots in various colours. They are a decent price, come
in lots of colours and I know what size I need)
·
A silver table runner I bought for £1 at the YMCA
·
Some red poly cotton fabric
·
Black, white, royal blue and yellow felt
I also used lots and lots and lots of Bonda-Web. If you don’t
know what this miracle stuff is, it is double sided iron on interfacing. You
iron it on the back of your fabric, cut out the shape you want, peel off the
paper, then iron your design onto the other bit of fabric (in my case the
shirt), then stitch over it. In my experience, Bonda-Web needs top stitching
because it will eventually unpeel but is great for holding fiddly designs down
without pins so they don’t shift as you try to sew.
I just made stencils for every part of the design then Bonda-Webbed them to the shirt (both front and back)
Then I either machine sewed (the red stripe, the silver stripe, Thomas’s head and body and the number in the box on the back) or hand sewed (the yellow window circles, his eyes, mouth and eyebrows, his accessories at the bottom) them to the shirt. To make his nose 3D I made a circle, sewed around it with a gathered stitch and pulled the circle shut after stuffing it with polyfill fluff. Then I thought my nose was too small so I did it again with a slightly larger circle and stuffed it with fluff as well as the previous too small nose. Then I sewed it by hand to the shirt.
I drew his smile lines with a sharpie. What colour sharpie,
you ask? Well, that’s up for debate. I had a grey and a silver. I used the
silver on one side, then stopped to make something for my tea, came back and
picked up the grey one by accident and then, oh no! The smile lines did not
match! After a moment of panic, I carefully traced over the grey line with the
silver and then carefully traced over the silver line with grey. Phew! Crisis
averted!
I didn’t make the red and silver stripes go all the way to the
side seams. I would like to tell you this was because I had anticipated that
attaching a non-stretch fabric to a stretchy one would necessitate making a little
slit on each side for ease of movement but really I am just crap at measuring
and made them a bit too short then couldn’t get it over my hips so had to cut a
slit and was thankful I had made a measuring mistake so all’s well that ends
well.
To make the ankle wheels I cut out a wheel template in blue and hand stitched it to a black circle while watching Horrible Histories. Then I made some wrapping straps which I sewed to another black circle. Then I pinned and re-pinned on my leg to get a cuff that fit my leg.
Then I sewed Velcro on and made some adjustments—I needed a little dart on one side and a corner clipped but now they fit my leg perfectly.
Then I hand sewed the circle on the leg band to the wheel circle and inserted a slightly smaller circle of cardboard (gold carboard in this case as it is what I had used to spray paint my Medusa crown).
View from the top:
Then on to the hat. The steam coming out has impressed a lot of folks so how did I do it?
I bought:
A stovepipe hat (taller than a top hat) and some invisible
hairnets like a dinner lady might wear.
Then I carefully stuffed polyfill fluff into a hairnet and sewed it closed then attached it to a piece of felt. Then I hot glued the felt to the top of the hat. I kept filling hairnets with fluff and using hot glue and tiny stitches to hold them together.
I am very pleased with how it came out. The only slight drawback is I don’t think the shirt cannot be washed. But having spent time in the theatre I know you can just spray it with a bit of Dettol or Lysol and call it square.What will I make next? Stay tuned!


No comments:
Post a Comment