Wednesday, 20 December 2023

Live Love Be Believe


Hello lovelies! The title of this blog is Live Love Be Believe which is the motto for the band the Crüxshadows. This is what I am trying to do:

LIVE in a world that has been turned upside down, live in a way I can be proud of and continue to live and grow and not shut down because the unthinkable has happened. I will never move on but I want to move onward.

LOVE and continue to love my Best Beloved, practice more self-love as learning to do all these new things on my own is hard without him, spread love and kindness with every step.

BE just learn to be whole without the person who I thought made me whole, just be in the moment not worrying about so many things, and be the person who is my best self.

BELIEVE that all shall be well, and all manner of things shall be well, that I will see my darling again and what a sweet reunion that will be and to believe in all the good magical things that there are in the world and to be a part of spreading that joy.

My new tattoos

This has been my tattoo year, it seems. I have met the Fabulous Ffion who makes my ink dreams come true. And because she can double up (or in today’s case triple up) designs during a one-hour appointment I have my final three of the year.

Like every one of my tattoos these designs have a deep personal meaning for me, and like most the ones I got this year they are related to my Best Beloved the Amazing Spiderman.

There is so much I wanted to say about them that it felt like it needed to be a blog post.

The first design is the logo for the band the Crüxshadows. We have loved this goth darkwave band for years and even were lucky enough to see them live in London several years ago which you can read about HERE. This band, led by the charismatic lead singer and songwriter with a moral compass Rogue has been a hero of ours for years. Their lyrics are influenced by literature, religion (one of their songs quotes directly from the 23rd Psalm) and Greek mythology. One of our favourite songs is Sophia, meaning wisdom. This song had a profound effect on both of us. Read some of the lyrics below and see why.

So you must carry this light into the darkness
You shall be a star unto the night
You will find hope alive among the hopeless
That is your purpose to this life

Do not injustice to another
Defend the weak and innocent
Let truth and honour always guide you
Let courage find the light within

Stand up when no one else is willing
Act not in hatred or in spite
Be to this world as a perfect knight
Even if it means your life

And through these doubts and through your confusion
Know that you are chosen to this fight
Look to find a soul filled with compassion
Look to see a living source of light

I wanted something to remind me always to be that Living Source of Light.

The second one is an hourglass. This timey-wimey symbol of Life, Death and Time Lords is also a reminder to me that we never know how long we have on this earth, and we must make it a good one, spreading love and kindness wherever we go so that we do not regret our lives. The Crüxshadows also have a song about this called Birthday.

Roll out of bed, look in the mirror
And wonder who you are
Another year has come and gone
Today is your birthday
But it might be the last day of your life
What will you do if tomorrow it's all gone?

Look at your life, who do you want to be before you die?
Look at your life, you haven't got forever

And tell me what really matters
Is it the money and the fame?
Or how many people might eventually know your name?
But maybe you touch one life
And the world becomes a better place to be
Maybe you give their dreams another day
Another chance to be free

You won't be young forever
There's only a fraction to the sum
You won't be young forever
Nor will anyone

I remember Spiderman playing it repeat every February 13th as he looked at what he done the past year to make the world better and what he hoped to do in the coming year to Be the Light. He brought a lot of good into the world, it just was extinguished far too soon. I have his ashes in an urn that is an hourglass to remind me of this song and who I want to be before I die.

The last one will make no sense to anyone but us except maybe Matazone Haggis who created the animated film. Spiderman and I had several ways to say I Love You without using words. The most popular one was this. The sound TK TK TK. A bit like the sound a tap-dancing pigeon might make. This all comes from a hilarious video by Matazone Haggis (creator of Mr Snaffleburger if you know that character) of Skippy the Goth Kangaroo. Which contains the hilarious dialogue:

Skippy the Goth Kangaroo: TK TK TK

Boy: What’s that Skip?

Skippy the Goth Kangaroo: TK TK TK

Boy: Aw, no! Lord Oberon Darkness-of-the Night has fallen down the well?

Skippy the Goth Kangaroo: TK TK TK

Boy: AND he's run out of eyeliner!

You can watch the video HERE.

So, I wanted to create the image of a stone well as viewed from above with TK TK TK inside so I could have a permanent I Love You from my Amazing Spiderman.

That makes a total of 11 tattoos for me this year (and brings the grand total all the way up to 28) but I love reading my body like a map that tells the history of my life but also that is a love note to the life I shared with the most amazing man I ever met.

Merry Christmas everyone and a happy new year!

Spidergrrl x

Thursday, 31 August 2023

Slowly Making a Snail

 Hello Lovelies!

I have wanted to make a Julia Donaldson costume for a while now, but what to choose? The Gruffalo is by far her most famous character but seemed too obvious. My favourite book is Stick Man but that didn’t leave much chance for creativity. About a month ago I was shelving Julia Donaldson books and I came across The Snail and the Whale. Eureka! That was perfect, especially because of Anne, Charlotte and Emily my three Giant African Land Snails collectively known as the Bronte Snails.


I started to scour charity shops for some trousers in brown tones and was lucky enough to find three pairs from the YMCA (£1.50, £1.50, 50p) and then found another pair at the Red Cross for £1.99.

I had literally no idea how big it would need to be as I have no spatial sense, so I used some packing paper at work and laid it out on the floor to get a sense of how long it might need to be. This is about six feet and it only coiled up about this big (see below) so I knew I needed to make it much, much longer.

I carefully cut them into rectangles about two hands wide (because I can’t be arsed to measure properly) and sewed them together in a very long strip, then folded it right sides together and sewed down the side making a very, very, very long snake.

 One of the things I am so glad I did was to leave a gap every ten rectangles (a two-rectangle gap to be precise) to make stuffing it easier.

 Then I tried it on and pretended it was a long scarf and I was Tom Baker (as you do.)

Next I set about to stuffing it. Online people said that bubble wrap was a good thing to use as it was light, but I didn’t have any and it was expensive. The other thing people talked about was scrumpled up paper so that it what I did. I had some brown craft paper I use as wrapping paper so I tore it into long strips and scrumpled it up and used that in  combination with some pollyfill fluff. Then as I filled each section I hand stitched it closed.

 When the whole thing was stuffed it measured an impressive 4.5 meters. I saved back some of the nicest houndstooth tweedy fabric for an art display as my favourite geek merch company Skelton Crew says in the future they will be making the key to 221B Baker Street so I need to be prepared!

 Now it was time to coil that baby up into a huge swirly poop shape. I used safety pins to make this happen. I wasn’t sure how many I would need and as it turns out I needed about 180 and had to go back twice to get more packs. I used the biggest pins at the four carinal directions and the medium ones in all the spaces in between.


Then I needed to attach the straps which in hindsight I probably should have added earlier. I used heavy duty strapping and D Rings to sew (and re-sew about 50 times) to the top and bottom and then added safety pins for extra strengthening.


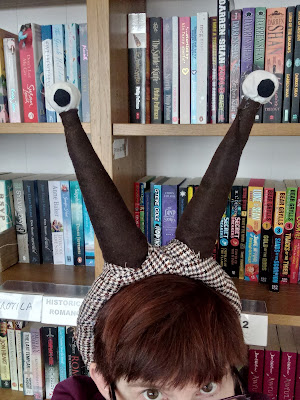
Then onto the eyestalks. I bought a wide headband from Poundland which was surprisingly comfortable (for a headband). I rolled up two squares of brown felt like a cone and stuffed them with more pollyfill fluff. Then hot glued them to the headband and added eyeballs to the top. Then I used leftover scraps to cover the headband to match the shell which made the headband slightly less comfortable because now it was tighter. But a careful strategic stretching and it now feels better.


So how do I put it on? The answer is with some difficulty. I bend over like I am trying to touch my toes with the shell balanced on my back and thread the straps through the D Rings and pull. Then stand up and pull the straps tighter and tie under my boobs.

How was it wearing it all day at work? Not that bad, actually. I did occasionally knock books off the shelf behind me and I could not fit in the cupboard under the stairs so had to get my colleague to bring a few things out (like the cordless phone and spare bags) before he left. Despite the size it was never as uncomfortable as the Medusa crown. I did notice some discomfort the next day between my scapula, but a bit of stretching and lying on my acupressure mat sorted it. 

Now I just need to figure out where to store it as it is quite large….


Monday, 17 July 2023

RIP Pippi Longstocking

Hello Lovelies,

I woke up this morning and the Pipster had shuffled off this mortal coil and gone to the big web in the sky. Then, as if this day couldn’t get any worse, I got to work which looked like a crime scene so I spent the morning mopping up blood from in front of the shop. 


Pippi was a complicated Spiderbabe. She was feisty. She HATED to have her tank moved. Even if you were just moving it so you could open the lid to add food for her, she would glare at you (well, maybe not glare—despite having eight eyes, tarantulas are quite blind) but she would definitely show her displeasure. She was FLICKER. And by that, I mean anything she didn’t like she would use a back leg to flick off a cloud of hairs in protest. She did this so often her abdomen had a big ole bald spot. Yep, our baby had a bald bum.

Flicking hairs is a defence mechanism in the wild as the hairs are barbed and extremely irritating. Tarantulas will flick hairs at a predator to blind them and be able to escape. It is also worth knowing that itching power you used to be able to order for cheap from the back of comic books was probably ground tarantula hair. Because of this I always like to wear protective goggles and gloves when I dealt with her.

She was also lightning fast. There were many times that everyone else got fed but she had to wait because she was also a wall climber. She would climb up the sides of her tank and then sliiiiide down which really could have used a squeegee sound effect because it was hilarious. But because she was a potential escape artist if she was attempting to climb up, we daren’t take the lid off for fear she would do a runner. So, she often had to wait for her supper until she settled back on the ground like a sensible spider.

I thought she was gearing up for a moult. She did it last year about this time and she was showing many of the signs. She was sitting with her bum in the water dish (more than usual) and she was doing what Spiderman used to call “spider yoga” where they press their bodies into the corner of the tank and arch backwards to get their carapace ready to pop off when it was time. She was also eating less (normally she was a greedy gobbler) but that is also a sign of getting ready for a moult. I wasn’t too worried.

A few days ago, she went to her favourite place in the back of the tank. When she wasn’t climbing and sliding, she liked to scrunch herself up into the small gap between the wall of her tank and her hidey cup. She took after her mummy on this as I too like to see if I can fit in small places (and get stuck.)

On Friday I gave the tank a jostle and she flicked hard at me. Saturday I was loathe to disturb her but did a little tappity-tap on the wall beside her and she moved her leg as if to flick but very little hairs came off. I attributed this to the fact that she was a baldy-bum and there wasn’t much left to flick. Sunday night I did the tappity tap and she raised a leg in warning—like swatting you away or giving you the finger. Though with eight legs how do you know which is the middle finger one?

I looked in on her this morning at around seven and she didn’t move at all, with a tappity-tap or a quite severe jostle of the tank. Oh dear. Then I did the water test because she HATED to get water splashed on her (something that was difficult if you were trying to fill up her water dish while she was sitting in it. Still water=OK, but falling water was a big ole NOPE.) Nothing. So, sadly I knew she had passed on.

At that point it was raining, so I took her out and examined for signs of disease but there were none that I could find. Her abdomen was a little shrunken, but I took that as she hadn’t been eating as much in preparation for the moult. I wonder if what happened was this. Did she ask herself:

“Do I have enough energy to do a full moult at my age?”

“No, I don’t.”

The End.

She was between fourteen and fifteen years old (hard to place her age but we have looked after her for fourteen years and she was at least six months old when we brought her home) so that is a good old age to be, and it does become much harder to moult the older they get—they just don’t have the enormous energy it takes to complete this exhausting process.

It stopped raining about 8:30, so as the ground was soft, I decided to take her out and bury her in the front garden before work. She is out there with several of her spider sisters (and 2 brothers.)

So, this just leaves Christina Rossetti. She is the last Spiderbabe of the original eight. She is between nineteen and twenty years old (she was definitely an adult when we adopted her in 2008) and I thought she would go before Pippi or Frida (who died in January). Rossetti hasn’t moulted since 2017 and is so chilled out she is basically horizontal, so it is difficult to tell how much time she has left. It is hard because the death of every Spiderbabe severs a connection between me and my beloved Amazing Spiderman because our love of arachnids was one of the things that brought us together. But I will admit it has been very stressful trying to care for everyone on my own. You definitely needed a Captain to feed/water etc and a lookout to be sure they didn’t escape while you did it especially with Pippi.

 So, goodbye to our feisty redhead. Our beloved Pip.


Saturday, 24 June 2023

Peep Peep! The making of a Very Useful Engine

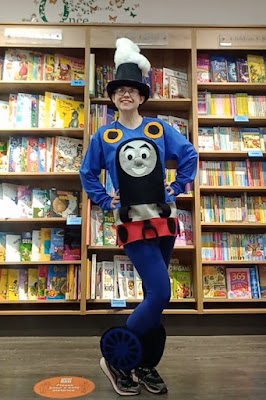
 Hello lovelies! It was Thomas the Tank Engine Day at work today. Many people have asked how I made the costume so I will try to give you a little story of how I did it.

This was one not primarily sourced from charity shops. I had to custom sew it to get the effects I wanted. 

Things I bought or sourced from my fabric stash for the shirt and wheels:

·         A long sleeve blue shirt (I love these Fruit of the Loom shirts. I have lots in various colours. They are a decent price, come in lots of colours and I know what size I need)

·         A silver table runner I bought for £1 at the YMCA

·         Some red poly cotton fabric

·         Black, white, royal blue and yellow felt

I also used lots and lots and lots of Bonda-Web. If you don’t know what this miracle stuff is, it is double sided iron on interfacing. You iron it on the back of your fabric, cut out the shape you want, peel off the paper, then iron your design onto the other bit of fabric (in my case the shirt), then stitch over it. In my experience, Bonda-Web needs top stitching because it will eventually unpeel but is great for holding fiddly designs down without pins so they don’t shift as you try to sew.


I just made stencils for every part of the design then Bonda-Webbed them to the shirt (both front and back)

Then I either machine sewed (the red stripe, the silver stripe, Thomas’s head and body and the number in the box on the back) or hand sewed (the yellow window circles, his eyes, mouth and eyebrows, his accessories at the bottom) them to the shirt. To make his nose 3D I made a circle, sewed around it with a gathered stitch and pulled the circle shut after stuffing it with polyfill fluff. Then I thought my nose was too small so I did it again with a slightly larger circle and stuffed it with fluff as well as the previous too small nose. Then I sewed it by hand to the shirt.

I drew his smile lines with a sharpie. What colour sharpie, you ask? Well, that’s up for debate. I had a grey and a silver. I used the silver on one side, then stopped to make something for my tea, came back and picked up the grey one by accident and then, oh no! The smile lines did not match! After a moment of panic, I carefully traced over the grey line with the silver and then carefully traced over the silver line with grey. Phew! Crisis averted!

I didn’t make the red and silver stripes go all the way to the side seams. I would like to tell you this was because I had anticipated that attaching a non-stretch fabric to a stretchy one would necessitate making a little slit on each side for ease of movement but really I am just crap at measuring and made them a bit too short then couldn’t get it over my hips so had to cut a slit and was thankful I had made a measuring mistake so all’s well that ends well.


To make the ankle wheels I cut out a wheel template in blue and hand stitched it to a black circle while watching Horrible Histories. Then I made some wrapping straps which I sewed to another black circle. Then I pinned and re-pinned on my leg to get a cuff that fit my leg.


Then I sewed Velcro on and made some adjustments—I needed a little dart on one side and a corner clipped but now they fit my leg perfectly.

Then I hand sewed the circle on the leg band to the wheel circle and inserted a slightly smaller circle of cardboard (gold carboard in this case as it is what I had used to spray paint my Medusa crown).

View from the top:


Then on to the hat. The steam coming out has impressed a lot of folks so how did I do it?

I bought:

A stovepipe hat (taller than a top hat) and some invisible hairnets like a dinner lady might wear.


Then I carefully stuffed polyfill fluff into a hairnet and sewed it closed then attached it to a piece of felt. Then I hot glued the felt to the top of the hat. I kept filling hairnets with fluff and using hot glue and tiny stitches to hold them together.

I am very pleased with how it came out. The only slight drawback is I don’t think the shirt cannot be washed. But having spent time in the theatre I know you can just spray it with a bit of Dettol or Lysol and call it square.

What will I make next? Stay tuned!

Friday, 23 June 2023

It Takes a Village...


...to raise a Spidergrrl.

Hello lovelies! What an adventure I have had. Anyone who has read my book The Wanting Comes in Waves will know that the last good thing the Amazing Spiderman did for me before he got sick and died was take me to get a mammogram in Pensarn. Well, it is that time again because it has been a little over two years.

This has thrown up lots of issues for me:

  • Grief over the fact that I have to do it alone this time (and the memory of what came after the last time)
  • Anxiety of all the related things that go with it like how to get there by bus (which bus do I have to get, where does it pick up? How much does it cost? How will i know where to get off?)
  • Once I am there the worry that they will find something because many women in my family have had breast cancer
  • Then the journey home: where does the bus pick you up to take you home because it is never the same place it dropped you off
The last time all I had to worry about was the actual worry that I might get a diagnosis of breast cancer because Spiderman found the bus times, got us on the bus, got me to the mobile unit in the Morrisons car park and got us on the right bus to come home. 

I just kept thinking, How can I do this alone? 

Several people said  Oh, you can walk to Morrisons! it takes about 15 minutes. it's easy! you just have to do things like:

go OVER a bridge

go UNDER an underpass

go THROUGH a tunnel

and then it just became a list of prepositions and that was even worse than trying to figure out the bus. I think these people have seriously underestimated just how lost I can get. The bus is stressful, but walking it blindly through Preposition Land is terrifying. maybe if i had  time to do a practice walk with a friend like Spiderman used to do with me, but not without having a go a few times before the actual day. I will take my chances with the bus. 

I know it seems silly. I am a grown-ass woman. I should be able to do this. But i really struggle with reading a bus timetable. How can I figure out what bus i need if the timetable looks like this? 

Seriously. It might as well be written in Chinese because I cannot make heads of tails of it. 

I have just been talking and talking to Spiderman asking for his help from beyond the grave to help me figure out how in the hell I can do this without him. 

And he came through. He sent me ALL THE ANGELS.  I mean, seriously. There were angels every step of the way. 

First, I had no idea what bus to catch. How do you find that out if you can't read the bus timetable? 

FIRST TWO ANGELS: My colleague Paul at work remembered that one of our regular customers Chas takes the bus that passes Morrisons. He emailed Chas for me and asked what bus he took. Chas confirmed that i need the X11. He told me where he catches the bus and it was outside my favourite YMCA charity shop. Chas came by the shop the next day and talked me through it in person as he knew i was anxious about transport issues. 


ANGEL NUMBER THREE: I now knew my bus number and where to catch the bus, but how would I know the bus times? My dear friend and neighbour Sian and I went out for a cuppa before work and I mentioned my predicament. She told me all about the TRAVELINE CYMRU app which lets you plug in where you are, where you want to go, and the time and date you are going and POW! it tells very clearly all the information you need and more! Isn't this so much easier to read???


So, today I had to completely rearrange my schedule. My Angel colleague Paul swapped shifts with me so i could get to my 3:20pm appointment. We also swapped book clubs. I did his book club today from 1-2pm and he will do mine next week on Tuesday night. 

After book club i changed into leggings and a t-shirt to make getting my boobs out a bit easier then I went down to the YMCA. I decided  I was in plenty of time to catch the 14:13 bus (2:13 to my American peeps) and I could just mooch around Morrisons supermarket for an hour as the bus ride was about ten minutes.   

There was still that worry about how will I know where to get off the bus. Several people said it would be OBVIOUS but they have not counted on how crap I am at spotting (or rather missing) landmarks.

Enter ANGEL NUMBER FOUR: The lovely Christine from book club which had disbanded a mere 10 minutes ago came over and said, "Oh are you taking this bus as well?" I confirmed I was. I explained that I was nervous about where to get off and she offered to DING the button for me at my stop. What a relief. And it really was a relief. I was staring with my X-Ray vision out the window looking for the obvious sign that said MORRISONS in big ole letters when i heard the bell go DING and Christine shout, "This is your stop!" I am eternally grateful as all I could see was this hugh-jass hedge so i would have never known it because i was looking in the wrong direction. 


ANGEL NUMBER FIVE: the bus driver. He was incredibly patient with me and told me where to pick up the bus on the way back. It involved crossing the very busy road and he told he me to use the crosswalk to get across. I hadn't even seen the crosswalk as i was too busy imagining myself as a real life FROGGER tried to hop across the road to the alligators on logs (well, the return bus shelter.)

I had an hour to potter around Morrisons so i found a few treats on special offer like this crazy delicious palm oil free chocolate spread. I bought two but after tasting it, wish i had bought the lot. YUM.


Then it was time for the ole mammogram which Spiderman described as a boob sandwich between two panes of glass. They let me in at 3:15pm for my 3:20 appointment. It took literally five minutes which included going over my details twice, taking off my bra, getting squished two different ways and getting dressed again. 


Before I went in I wished I had gone for a wee but when I came out i didn't need to go anymore so it must have been just nerves. 

I looked at the Traveline app and it looked like i would need to wait until 15:54 (3:54 for my American peeps) to return to Carmarthen so i went over to the crossing, pushed the button, stopped the cars and crossed over. I was resigned to wait for 30 minutes when lo-and-behold an X11 bus was trundling our way. The mammogram had happened so quickly I had managed to catch the 15:24 (3:24) back to town. And just like that I was back on familiar ground by 3:38. 

I am so insanely proud of myself for figuring it out without crying that I feel like I have climbed Mt Everest. It feels stupid because taking the bus should be a life skill, but it is not one I acquired because Spiderman was the great navigator. But now i know I can do it though I could not have done it without all the ANGELS. 

Thanks Best Beloved. 

Wednesday, 3 May 2023

The Hiss-tory of Medusa

 Hello lovelies! 

I have been wanting to make a Medusa costume for years. Even though she can turn people to stone by looking into their eyes I believe she is a tragic figure. I mean, she didn’t start off all snaky, did she? No. She was raped by Poseidon in the temple of Athena and Athena punished her by making her hideous and so that no man could ever love her. Victim blaming much?

To start this costume, I needed some snakes. I started going around to charity shops to see if there were any rubber snakes about. Carmarthen Free Books gave me one they had been hiding around the shop to scare each other (which made me laugh as that was one of the many games that Spiderman and I played). A few friends posted me some rubber snakes they found in their house. A lovely customer came by with a few (and then a few days later a few more). I bought a packet of small ones from Amazon. Now we were set!

Most of the tutorials I found had them attached to a hair band. I was worried that would be unsteady and slide off every time I looked down. I planned to wear it at work and hopefully to Swansea Comic Con so it needed to be comfortable and stable.


I decided to build a bespoke crown to the shape of my head with support straps over the top. I bought 2 dog leads from Poundland (£2 each—when did Poundland stop selling everything for a £1??) and created a base.


Then I used some tiara bits I got at Poundland for £1 and used hot glue and wire to attach to the sides to give the snakes some scaffolding to hold onto.

front

Then I started draping the snakes and using hot glue and wire to keep them in place.

back
Next I had to wait until it stopped raining to go outside and spray paint them gold! My friendly customer also gave me a huge heavy snake which works perfect as a necklace.

I am really pleased with the results. My only issue is that it is a bit heavier than I intended. It weighs about 500g (a little over a lb/pound!) but luckily it sits very well balanced on my head. I added strips of black felt in the inside so any wires wouldn’t poke my head. I also decided to wear the black chiffon scarf under it to give the illusion of long hair but also be able to hide any padding I might hide under the crown.

VERDICT: I *love* the way it looks but it was very heavy. I don't think it will suitable for Comic Con but it definitely works for one Saturday a year dressing up at work. I think I just got carried away adding snakes, but I am very proud of how it turned out. 

Friday, 10 March 2023

I made a Thing

 Hello lovelies! My life has been really busy at the moment with some good and some bad things, but one of the good things is that I have been able to make some incredible crafts for various costumes for work. 

I am working on a Wednesday Addams costume to wear to work on our dress up Saturdays. I managed to find all the clothing  at local charity shops and then I ordered a wig from EBAY. But I really wanted a Thing hand to use as a prop in the photo shoot. However looking online they were hella-expensive. Like between £30 and £60 and I was NOT gonna pay that just for a quick prop.

So what is a crafty Spidergrrl to do but make one herself.


Is it perfect? No. But is it pretty good? yeah. 

So how did I make it? 

First I bought a pair of tan PU leather (meaning not from animals) gloves from EBAY for £2.99.


Then I drew on them in red sharpie where I wanted the scars to be be. While the ink was wet I smudged it with my finger to make the lines blurry.


Then I used black embroidery floss to stitch it up. I had to cut the glove down the side to be able to reach all the places on the back of the hand, but that was fine. I just stitched up the side when I was done.

Next I added some wire into a disposable glove. I put wire in all the fingers and then taped it down at the wrist. Then I carefully inserted the wired glove into the Thing glove. This was so Thing's fingers could bend. I taped a few wires on the other side of the glove to help the wrist be able to move a bit more when it was done.


Then I filled the wired glove inside the Thing glove with uncooked rice. This was to weigh it down and make it heavy but also keep it flexible. It took ages as I could only do a few spoonfuls at a time and had to use a pencil to push rice all the way into each finger. 


Next I hot glued a circle of cardboard with little fold up flaps to stick it to the sides of the glove to keep the rice from falling out and keep the wrist from collapsing. I forgot to take a photo of this so you will just have to use your imagination.

Lastly I used the Thing to trace a circle the same size as the open top from the other glove, cut it out and sewed it to the open top to close off the wrist. I decided it needed fingernails so I used a brown sharpie to draw some dirty nails and then smudged the wet ink.

And voila!


It doesn't have a huge amount of flexibility, but it has enough to do what I wanted. The fingers bend down, the wrist bends up. It looks quite good and  I spent about £3 and two hours to make it which sure beats £30-£60. 

I plan to wear the Wednesday Addams costume sometime in May when the weather is warmer as it isn't the sort of costume that can fit a lot of layers underneath. Watch this space! 

Wednesday, 8 February 2023

Quick Curried Potatoes with Roasted Broccoli

Hello lovelies. I mentioned on Facebook that my friend had gotten us both a Spice Advent Calendar and so I was looking back at recipes that might be good with certain spices. Lots of these spice combinations definitely have a curry sort of feel to them, so there will be lots of curry variations in the near future which is a-okay with me.

I remembered this recipe as one that Spiderman and I ate often. It involved boiled potatoes which were then cooked in a variety of things like spices, ginger and garlic, peanuts, sesame seeds and desiccated coconut, plus a tin of chickpeas to make it a meal. I realised I hadn’t eaten it since Spiderman died because I wasn’t sure if the potatoes would hold up with a reheating. I somehow had it in my head they would be mushy on day two, but they were not. A teency bit softer perhaps, but not turning into mash. And they were a doddle to reheat in the 5 minutes it took the broccoli to crisp up in the air fryer.

The beauty of doing this recipe with a friend is we both just used what we had—so I had little new potatoes which do hold their shape a bit better, but she had larger old crop potatoes which were a bit softer, but still good. I used chickpeas but she used butterbeans as that is what she had in her cupboard. She also realised that she was out of both coconut and sesame seeds at the last minute, but she reported that it was still delicious. So if you don’t have it, don’t sweat it.

If you want to read the original recipe go {HERE}

The spice that we used was basically about a Tablespoon of curry power which contained things like turmeric, ginger, cumin, coriander etc so feel free to do it like the original recipe or just use curry powder.


Quick Curried Potatoes with Roasted Broccoli

You need:

400 grams new potatoes, diced

Boil these in a pot of water until they can be pierced with a knife. It won’t take long. Meanwhile get your other ingredients in place.  Don’t roll your eyes at the thought of lots of little containers. It will make the next step go so much easier if you can just dump and go.

The other ingredients:

1 tin chickpeas, drained and rinsed

Container 1:

1 tsp cumin seeds

1 tsp chili flakes if your curry powder is mild

1 TB finely chopped ginger-root

Container 2:

3-4 cloves garlic, crushed

Container 3:

1 TB curry powder (or the spices from THIS recipe)

¼ cup roasted salted peanuts

1 TB sesame seeds

1 tsp sea salt (if your curry powder doesn’t contain it)

Lots of black pepper to taste

To do:

When the potatoes are nearly done heat 1 TB oil in a different large pan. Drain the potatoes and reserve them over to the side.

When the oil is hot, add container one and cook for a minute stirring constantly. Then add container 2 and cook the garlic for another minute stirring constantly. Then add the potatoes and chickpeas and container 3 and cook for another few minutes stirring constantly until everything is hot and the potatoes are coated with the spice mix. If it starts to stick, then add a tiny splash of water.

Serve with something green on the side. I used broccoli I roasted 5 minutes at 200C/400F in the air fryer and my friend used steamed frozen broccoli. Do what you have. A handful or frozen peas into the boiling potato water would also work.

Today and tomorrow
This was delicious both days and quick to make and quick to reheat. I will definitely eat it again and I cannot believe I waited nearly two years (because it has been nearly two years since I lost my Best Beloved) to eat it again.

Wednesday, 1 February 2023

Make-It-Up-As-You-Go-Along Cream Sauce Paste with Roasted Broccoli and optional falafel

Hello lovelies! Last week I shared a recipe that used half a tin of cannellini beans. Which then makes a person think, “Now what do I do with other half of the tin?” When you live alone there is quite a lot of coming up with something to do with other half of a tin of beans. Should I just eat the same thing that I did the night before? Well, I could but I had already frozen the rest of the olive tapenade. Plus, I was out of both kale and sun-dried tomatoes. I did want to eat pasta because that is what I had (all potatoes had been used up earlier in the week) so I had to put on my thinking cap.

I stopped by M&S on the way home and grabbed a broccoli (cheapest place to get broccoli without plastic packaging) and planned a recipe in my head on the walk home from the shop.

In the end I made a sort of lemony cream sauce which was delicious, but it made much more than I was expecting so my pasta was a bit on the saucy side. Next time I will make a full batch using a whole tin of beans and freeze half and eat the other half over 2 nights. I can just vary the herbs (Za’atar instead of mixed herbs) or change up the vegetables or do one night over pasta and one night over potatoes.

Make-It-Up-As-You-Go-Along Cream Sauce Paste with Roasted Broccoli and optional falafel


The veg I used were:

1 onion

Handful of chopped red pepper (I chop a pepper at the start of the week and keep it in a container in the fridge to just throw in however much I want into meals that week)

A bit of carrot (I was slicing a carrot to feed the Bronte Snails and I just cut some of it into matchsticks.)

Cook this in a large pan with either a splash of water or oil

Make your sauce then let it simmer with your veg:

Half a tin white beans

¾ cup unsweetened non-dairy milk (I used soya milk)

1 TB tahini

Juice of one lemon

3 TB nutritional yeast flakes

Whiz all that in a blender until smooth then throw into your veg pot to simmer.

Do your pasta:

Measure out your pasta (I used 1 cup GF pasta) and put your water on to boil in a second pot. When the water starts to boil add your pasta and cook as the package recommends.

Optional sides:

I was lucky enough to be gifted with an air fryer, so I just threw in some broccoli misted with oil and sprinkled with garlic powder in at 200C/400F for five minutes, stopping after two minutes to toss in a few falafel that I had in the fridge that needed to be eaten. If you are not lucky enough to have this wonderous contraption, then start with this first. Preheat your oven to 200C/400F and roast broccoli for 20 minutes until lightly charred. While it is roasting, cook your veg, make your sauce and boil your pasta.

The air fryer is genius because it cooks so quickly and you don’t have to turn on the oven just for one person so it really helps with cooking for one. Save up for one because they are totally worth it.

When the pasta is done, drain it and add it to the hot sauce. Top with your broccoli and falafel if you have some.  Like I said, I think this could have used double the amount of pasta in there and still felt saucy. So, if you are cooking for two this still would work. If you don’t have any broccoli or don’t want to turn on your oven throw a handful or 2 of frozen peas in the boiling pasta water so you get something green in you.